In my last post I introduced the concept of using Windows Authorisation Manager (AzMan) to manage the automation of Office 365 licenses. In this post I will go into detail on how the solution hangs together.
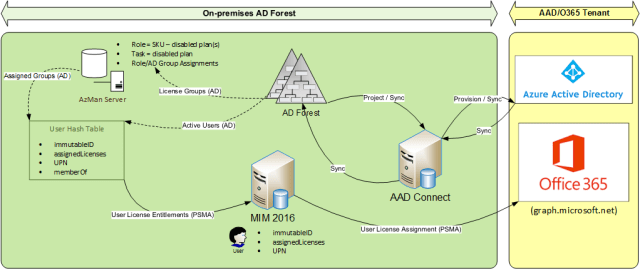
Complementing AAD Connect with MIM 2016
The main components of my solution are as follows:
- AADConnect (OOTB identity bridge between AD and AAD for user/group/contact sync)
- MIM 2016 (to complement AADConnect)
- AzMan (SQL database storage option)
- 2 MIM 2016 management agents (e.g. PowerShell)
- User License Entittlements (sync source for user.assignedLicenses)
- User License Assignment (sync target for user.assignedLicenses)
As many of you will know, it is technically possible to extend AADConnect to include additional management agents and negate the need for MIM2016, however this was not my recommended approach for many reasons, including the following:
- AADConnect extensions will invariably require extended Microsoft support over and above the standard AADConnect support options;
- MIM2016 synchronisation remains a cost-effective option for any enterprise IAM architecture on the Microsoft platform; and
- The MIM synchronisation configuration for this solution requires no rules extensions (only direct attribute flows)
Aside from the AzMan approach itself, the benefits of using the MIM 2016 sync engine (or FIM 2010 R2) in lieu of the traditional scripted approach should not be surprising for any of us, and include the following:
- State based approach – provide ongoing reconciliation between expected (entitlements) and actual (assignments), avoiding the need for report-based options such as this one;
- Timeliness of changes – delta sync cycles can be used to process only the changes since the last sync cycle;
- Maintainability – maintaining a centralised authoritative source of rules/roles governing license entitlements ensures ongoing ease of-maintenance; and
- Auditability – enforcing a centralised authoritative source of rules/roles governing license entitlements ensures license accountability and compliance.
Creating the AzMan Store
Setting up an AzMan instance itself is straight-forward given this is a standard feature maintainable via a simple Windows MMC snap-in.
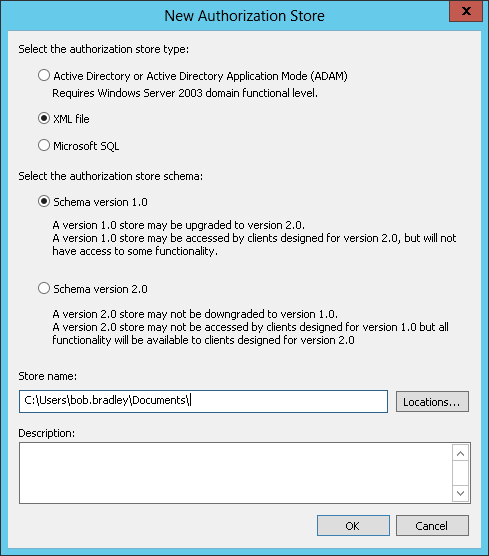
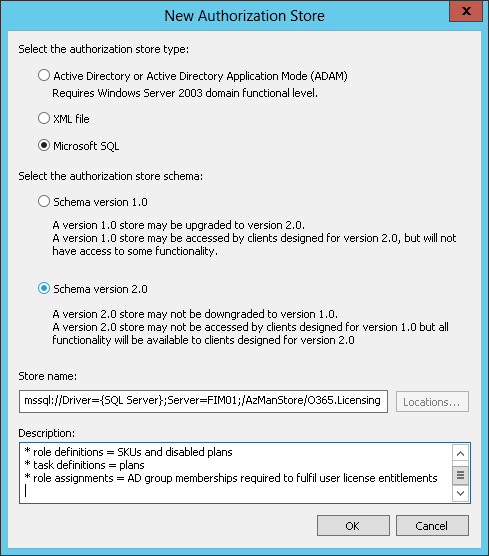
While there are 3 options for hosting my AzMan store, I chose SQL over XML and AD – a decision made easier by the fact I could reuse a SQL alias I already had in place for my MIM Sync service. For more information on the choice of store, see Managing Authorization Stores.
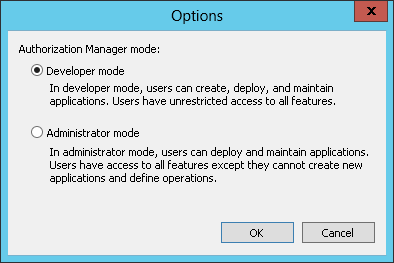
Note: The AzMan store must remain in Developer mode from this point so that configuration can continue via the MMC snap-in UI.
Configuring the AzMan Store for Office 365 Licensing
Initially I chose to set up my AzMan store data manually via the MMC snap-in. You may choose to do this too, but I chose to script this entirely in PowerShell to assist me in the deployment phase, as well as allow my customer to maintain the master data in the way they were more comfortable (initially at least) – yes in a Microsoft Excel Spreadsheet.
Set up Task Definitions
In my AzMan model a “task” represents a service plan, or specifically a “disabled plan”. When an SKU is assigned to a user, service plans that are to be excluded for that user are listed as disabled plans. To get a list of all possible disabled plans I have used the latest Service Plan table from this TechNet article to come up with the following:
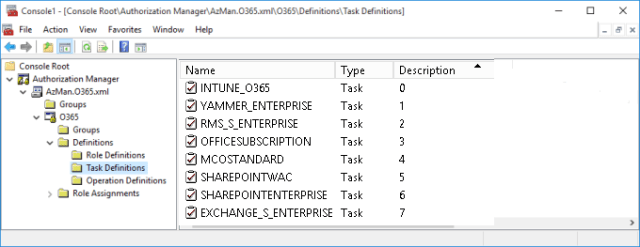
When entitlement details are extracted for FIM processing, both the Name and the Description (“Seq” index) are read, but only when it is associated to a role definition with at least one disabled plan. Plans must always be extracted/listed in index order.
Set up Role Definitions
For my model a “role” represents an SKU and zero or more disabled plans. How these are set up will most likely be specific to your enterprise’s unique requirements, but the following is an example of how this might look. Note that the SKU name appears in the Description property – this is an important part of the data model because this SKU name must be able to be extracted for each (arbitrary but unique) role name.

The role definition for “Office 365 Enterprise E3 – no Exchange nor Skype” is highlighted because this best illustrates the concept of optional disabled plans. Opening the properties dialog you can see this is managed like so:
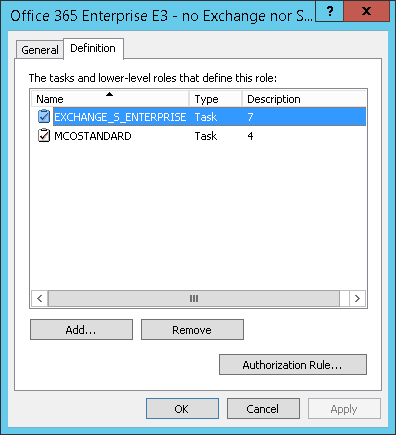
When entitlement details are extracted for FIM processing, the Description is all that is read from any group-assigned role, along with the Name and Description (Seq) of any associated disabled plans.
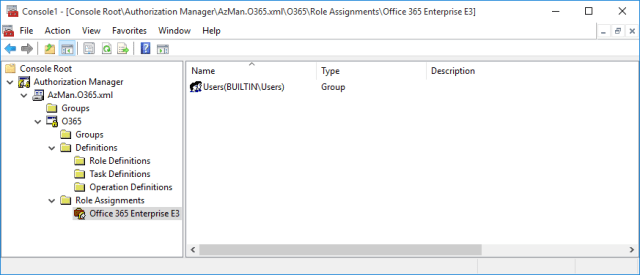
Set up Role Assignments
This is where the real power of the model comes into play. By assigning 1 or many AD groups to the roles constructed above, a collection of groups and a constructed string in the following form can be constructed:
Format
SubscribedSku.skuPartNumber : ServicePlanInfo.servicePlanName ; ServicePlanInfo.servicePlanName ; ...
Plan name : disabled plan name ; disabled plan name ; ...
Example
ENTERPRISEPACK:OFFICESUBSCRIPTION;SHAREPOINTENTERPRISE;EXCHANGE_S_STANDARD
The following is a dummy role assignment to illustrate the concept – but this screen would normally have at least one entry per defined role, and multiple AD groups assigned to each:

Bringing it all together
The following PowerShell script takes whatever data you have in the above store and renders it in the following table format:
- groupDN
Single value string property, retrieved from AD from the group ID read from the AzMan role assignment, this is then able to be joined on the user.memberOf DN
- assignedLicenses
Multi-value string property, constructed from the role and task data linked to the role assignment – this is the data which can be directly synchronised to Azure via the GRAPH REST API.
Note that the script makes use of the “MIM” SQL alias I already have set up for my MIM SQL connection – allowing me to host the script on the MIM synchronisation host server.
# -- BEGIN PowerShell Connector Script

 # Create the AzAuthorizationStore object.
 #Add-PSSnapin Interop.AZROLESLib -ErrorAction SilentlyContinue
 $AzStore = new-object -com AzRoles.AzAuthorizationStore
 # Initialize the authorization store.
 # Refer to https://msdn.microsoft.com/en-us/library/windows/desktop/aa376359(v=vs.85).aspx for initialize parameters
 $AzStore.Initialize(0,"mssql://Driver={SQL Server};Server=MIM;/AzManStore/O365.Licensing")
 $AzStore.UpdateCache($null)
 # Create an application object in the store.
 $qbeApp = $AzStore.OpenApplication("O365")

 # Create HashTable of all group/assignedLicenses associations
 $licenseAssociations = @{}
 $licenseAssociations.Add("Groups",@{})

 # The following is to demonstrate what the PowerShell connector would look like which acts as a lookup-table to join on each users "memberOf" property - thereby
 # allowing for multiple licenses

 # Loop through all role assignments to return the role for each member MemberNames
 foreach($assignment in $qbeApp.RoleAssignments) {
 #$assignment
 foreach($member in $assignment.MembersName) {
 #$member # AD Domain\Group
 $groupDNAD = (Get-ADGroup -Identity $($member.Split('\')[1])).DistinguishedName
 $groupDN = "CN=$((Get-ADGroup -Identity $($member.Split('\')[1])).name),OU=LicensedUsers,DC=IdentityBroker"
 #$assignment.Name # EMS role
 $role = $qbeApp.OpenRole($assignment.Name)
 foreach($def in $role.RoleDefinitions) { # disabled plans
 #$def.Description # SKU
 #"$($def.Description):$tasks" # assignedLicenses
 $tasksAsString=""
 $tasks = @{}
 foreach($task in $def.Tasks) {
 $obj = [PSCustomObject]@{
 Name = $task
 Seq = [int]($qbeApp.Tasks | Where-Object {$_.IsRoleDefinition -ne 1 -and $_.Name -eq $task}).Description
 }
 $tasks.Add($task,$obj)
 }
 foreach($task in $tasks.Values | Sort-Object Seq) {
 if($tasksAsString.Length -gt 0) {
 $tasksAsString+=";"
 }
 $tasksAsString+="$($task.Name)"
 }
 }
 $assignedLicense = $def.Description
 if ($tasksAsString.Length -gt 0) {
 $assignedLicense += ":$tasksAsString"
 }
 $licenseAssociations.Groups.Add($groupDN,@($groupDNAD,$assignedLicense))
 }
 }

 #Repeat/loop through each item in a target system
 foreach($group in $licenseAssociations.Groups.Keys) {
 $group
 $licenseAssociations.Groups.$group[0]
 $licenseAssociations.Groups.$group[1]
 }

 $AzStore.CloseApplication($qbeApp.Name,0)
# -- END Connector Script
Note that the script above outputs the groupDN and assignedLicenses properties to the console – for your own MIM connector implementation you will need to take this to the next steps yourself, i.e. essentially merging the group-keyed data with user-keyed data, joining on user.memberOf, and present a consolidated data set to MIM in the form of a User License Entitlements MA.
 Important: The script now takes care to order tasks as “disabled plans” according to the (integer) index (stored in the task description). This ensures that the assignedLicenses are reflected back in the order that they were sent (vital for a sync configuration with MIM).
Conclusion
While I won’t go into the specifics of the MIM side of the implementation – mainly because the preferences for this will vary from place to place – I trust that I have presented a repeatable approach that can get us away from the ongoing pitfalls of either a scripted approach, or any other sync approach which does not provide the same levels of extensibility and manageability.
In my case user volume levels meant that a MIM PowerShell MA was not going to suffice, and I needed to use UNIFY Identity Broker to provide the scalability and throughput to meet target SLAs, others may find that a PowerShell MA approach is adequate – at least for now. If anyone is interested in exactly how I took this idea to the “next level” in this way, I would be more than happy to elaborate – but for now I felt that it was important to share the above approach as a superior way forward to Automatically Assign Licenses to Your Office 365 Users.
Footnote
Some of you will be aware that AzMan has been marked as deprecated as of Server 2012 R2, which means that this will be the last version of the OS which will incorporate this feature. In case you’re wanting more info on this, read this MS blog post.
However, rest assured I took this into account when investing energy into the above solution – noting that it will be “… well into 2023 before we see the last of AzMan” and by then I am expecting there to be an even better way of providing role/rule-based license allocation for Office 365. Regardless, I needed something which:
- Supported the O365 licensing data structure I was modelling;
- Had a “free” UI which allowed me to link to AD groups; and
- Had an API which I could use to firstly read the data the way I needed to, as well as load the data from a master source.
… and this definitely ticked all the boxes for me – noting that I wasn’t actually using the main feature AzMan was designed for, namely its access checking API for buttons/panels on forms. If I can get 6 years of use out of this between now and 2023 then great :).


You must be logged in to post a comment.